Facebook’s new Places feature lets you share your
whereabouts with all your friends. Here’s how it works
on a smartphone or PC.
Facebook's new Places feature lets you share your current location by "checking in" from your smartphone. Whether you never really got into earlier location-based social networking services like Gowalla or Foursquare or just want to know what it is (and how to turn it off), read on for everything you need to know about Facebook Places.
Keep in mind that Places isn't available everywhere just yet--early reports indicate that it's United States-only, for now, but with significant gaps at the moment--so you may just have to wait.
Checking In Via Smartphone or PC
Checking In Via Smartphone or PC
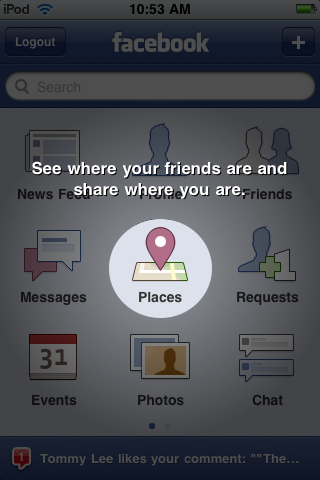
Before you can share your location with your Facebook friends, Facebook needs to know where you are. Just open touch.facebook.com in your Web browser (or use the Facebook for iPhone app on your iPhone, iPod Touch, or iPad), and you'll see a tab under "Inbox" called "Places." For the iOS app, it'll show a new icon in the middle of the home screen.


Tap Places, and you'll see your recent check-ins as well as your friends' check-ins. From here, you can find out more details about the places your friends are checking into (map location, description, directions, comments, and other check-ins), or you can check yourself into a nearby location by pressing the Check In button at the top-right corner of the page.
If you can't find the right place to check in from, you can browse more nearby locations by pressing the right arrow button under the Places tab until you find it (if you're using the iPhone app, just scroll all the way down and press Show More Nearby Locations).
If you can't find the right place to check in from, you can browse more nearby locations by pressing the right arrow button under the Places tab until you find it (if you're using the iPhone app, just scroll all the way down and press Show More Nearby Locations).
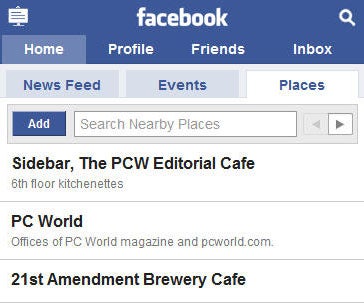
The list of available locations comes from other people's check-ins and listings from Bing's mapping engine, so you might have to add your location yourself--just press Add, and it will take you to a page where you can fill out a name and description.
Once you tap Check In, you'll be presented with a list of nearby locations where other people have checked in. Tap the one you want to check into, and you can choose to comment on what you're doing there or add your Facebook friends to your check-in (Press the What are you doing? and Tag Friends With You buttons, respectively). Next, press the big Check In button, and it will show up on your News Feed.
While Places is mostly meant for smartphone users, it doesn't depend on a GPS device to find your location--you can check in from a laptop or iPod Touch, too. Just go to touch.facebook.com in your browser (you'll need Internet access, of course), and you can check in from your desk or café.
Checking In With Friends
Unless you're on Facebook just to show everyone what a loner you are, you'll eventually want to add the friends you're hanging out with to your Facebook Places check-in. All you have to do is choose the Tag Friends With You option while checking in.
Once you've added your friends and checked in, it'll show up on their News Feed as well. If they haven't used Facebook Places yet, it won't show up on their feed until they've approved the check-in; they'll see a little alert the next time they log in, asking them to allow or deny the check-in.
You can add friends only when you're checking in, so if you forget about adding someone and want to add them later, you're out of luck.
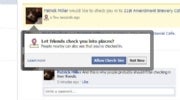
This can be rather tricky for users concerned about privacy--while researching this piece, I checked several of my PCWorldcolleagues into local bars at about 11am on a workday--so if you want to use Facebook Places without letting your friends check you in, you can disable it by turning off Friends Can Check Me Into Places in the privacy settings (click the link for detailed instructions). Once this is disabled, your friends can still try to add you at check-in time, but it won't display on the actual check-in.
Owning Your Facebook Place
You can add friends only when you're checking in, so if you forget about adding someone and want to add them later, you're out of luck.
This can be rather tricky for users concerned about privacy--while researching this piece, I checked several of my PCWorldcolleagues into local bars at about 11am on a workday--so if you want to use Facebook Places without letting your friends check you in, you can disable it by turning off Friends Can Check Me Into Places in the privacy settings (click the link for detailed instructions). Once this is disabled, your friends can still try to add you at check-in time, but it won't display on the actual check-in.
Owning Your Facebook Place
While anyone can add a Facebook Place, business owners can turn the listing in Places into a proper Facebook Page, with Likes and a Wall and all that other fun stuff. (Don't forget to read "Three Ways Business Can Take Advantage of Facebook Places.")
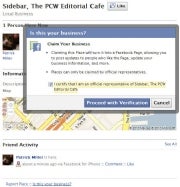
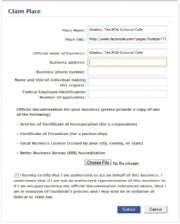
Start by checking in from your Place (or adding it, if it doesn't show up in the list of nearby Places), and click the link on the bottom of the page that says Is this your business?
Facebook doesn't want people cybersquatting on someone else's business listing, so you'll have to check a box certifying you're an official representative of the business and click Proceed with Verification to continue.
Next, you'll have to provide your business's contact information, including your Federal Employee ID number (if applicable) and some kind of official documentation (Certificate of Formation, Articles of Certificate of Incorporation, a local business license, or a BBB accreditation).
Once you've submitted that information and received the okay from Facebook's User Operations team, you'll be in full control of your new Place. No word on what happens if you're caught impersonating an employee, and we don't recommend trying it.
How To Turn Off Facebook Places
Dabbled with Facebook Places and decided it isn't for you? There are a handful of settings you'll have to change to fully deactivate it. Start by going to Account, Privacy Settings, and click Customize settings under Sharing on Facebook.
From here, you'll need to change the settings for Places I Check In, People Here Now, and Friends Can Check Me into Places (under the Things Others Share heading).
You'll need to change one more setting: Go back to Privacy Settings, choose the Edit your settings option under the Applications and Websites heading, and click Edit settings for Info accessible to your friends.


While anyone can add a Facebook Place, business owners can turn the listing in Places into a proper Facebook Page, with Likes and a Wall and all that other fun stuff.
ReplyDelete