Showing posts with label Web Developing. Show all posts

How to put put Posts into your Pages in Blogger


This article shows how to set up your blog, using Blogger, so that it looks like your posts are on separate web-pages. 


Can you put Posts onto Pages in Blogger?

Ever since Google introduced "pages" into Blogger, people have complained that their posts all go onto the "home page", and asked how to put posts onto different pages in their blog.


The standard, but unsatisfactory, answer is
"Sorry, that's not how Blogger works.   So called "static" pages in Blogger are meant to be used for reference information that doesn't change often, which you don't want to be part of your regular post-feed, but which you do want users to have easy access to."

Basically, this is part of the difference between post and pages.

Luckily it's easy to set up your blog so that it looks like your posts are on different pages [tweet this]

.... even though you and I know that this isn't how Blogger works.

The only aspect that some people don't like is that their posts all show up on the "home page" was well as the topic pages, but even this can be worked around, at least sometimes.


Follow these steps:

1  Categorise your posts by adding Labels to them.


2  Make a "pages look alike" menu bar:   

There are (at least) are three ways of doing this - choose which ever one suits your blog best:
a)   With a Labels Gadget:    
Use the usual add-a-gadget approach to put a Labels gadget into the spot where you would put the Pages gadget if you wanted to make a horizontal menu bar with it.

If your blog has some Labels that you don't want to have "pages" for, then set it to show only some of your Labels:

         b)   With a Linked-list gadget:   
Use the usual add-a-gadget approach to put a Link-list gadget where you would put the Pages gadget if you wanted to make a horizontal menu bar with it.
Add a link to the list for each Label that you want a "page" for.   The HTML to use for each Label value is

http://YOUR-BLOGS-URL/search/label/THE-LABEL-NAME

You can also add other items (eg individual Posts, or even Bllogger's static "pages" if you really must have them - see why I don't like them!) - see the menu bar at the top of this site for an example of this.


c)   With a Pages gadget:   

Use the usual add-a-gadget approach to put a Pages gadget into the menu bar area.
Use Label-links described above the Linked-list gadget option, aswebsite links to add to your Pages gadget.


3   If you don't want all posts to appear on the "home page" was well as the topic pages, set your home page to show zero posts, by setting  "Number of posts on main page:" = 0   on:

Post-Sept-2011-Blogger (aka the new interface)   Layout  > Blog Posts (edit),
Pre-Sept-2011-Blogger (aka the new interface)     Design > Page Elements > Blog Posts (edit)


Alternatively, you could use a technique similar to Showing a Gadget only on the Home Page  to not show the Blog Posts gadget on the home page.  the condition to use is !=  instead of ==)   If you do try this, then I strongly recommend that you consider the various options for giving your blog a home page, and make sure you accept thedisadvantages of editing your template.


Job Done

It really is that simple.  Your readers can now click on the "pages" in your blog from a "menu" at the top, and see a list of posts for the Page that they chose.   Even better, if some posts relate to more than one topic, they show up on both of the relevant pages.

Don't forget to test your blog, to make sure that the menu bar is working how you expect it to and that it looks OK, in all the browsers that your readers are actually using.


I'm keen to hear if this approach works for you. 
  • It is a "good enough" alternative to "real pages"?
  • Are there any other side-effects of using Labels to "pretend" to be web-page titles?
Please leave your thoughts in the comments box below.

Showing a Google Custom-Map on your Blog

This article is about embedding custom maps made with Google maps into blogs made with Blogger.  However similar principles also apply to putting Google custom maps into other types of website.

Overview: 

Previously I've described how to make a custom-map in Google Maps

Not only does this add a visual dimension to your blog, it can also be an excellent way of showing your progress on a journey, or describing your neighbourhood or the area that you blog about. 

That said, you should also use the Location tags in posts, so that the posts themselves as well as the map shows your status.


If you are using Google custom maps, then once you have created a map, you can:
  • Email a link to the map to other people:  when they click on the link, their web-browser opens Google Maps, and shows them them map
  • Put a link to the map on a website:  when a viewer click on the link, their web-browser opens  Google Maps and show them them map
  • Embed the map into a website:  when the web-page loads, the map (including zoom-tools, scrolling, etc) is displayed.

How to to link or embed a Google custom map:

Log in to Google maps using the Google account that you used to create the map.

Make a new map, or click "My Places" to see the list of maps you have made.

Select the map you want to link to.

Click the "Link" item:  it's at the top of the left-hand sidebar, beside the print icon.

A new panel opens just underneath the Link button.:


If you want to share the map by email, or by linking to it on a website, then copy the code from the top entry in the panel, which is labelled "Paste link in email or IM".

However if you want to put the map itself into your blog, then DON'T just copy the code from the item labelled "Paste HTML to embed in website".

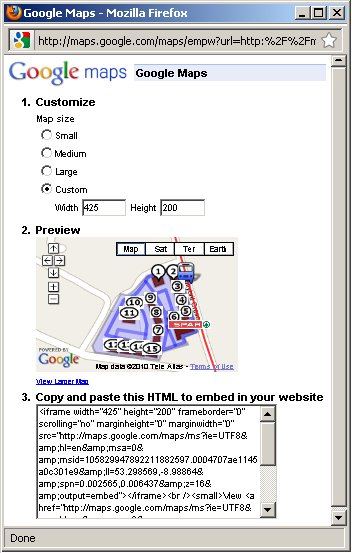
Instead, click Customize and preview embedded map.

This opens the map in a new window, where you can preview the actual zoom-level that will be used, and also pick a standard map size of a custom one. 

Choose the settings that you want - including scrolling up and down slightly, so that the correct area is shown.

Copy the HTML from the window at bottom of the screen.  (Make sure you select ALL the code that's in the box: on many systems with happens if you put the cursor in the box and press Ctrl/A)

Put the copied HTML into your blog -  you have several options for doing this.

Giving your Blog a Home Page


This article is about the options for setting the home page for blogs made with Google's Blogger.

Blogs don't have a "home page", main page or "landing page" in the same way that regular web-sites do.  Instead, they show the newest post first, since (hopefully!) most readers will be return visitors, coming back to see what's new.

But there may be blogs/websites where you want a welcome message or a particular post to appear first whenever someone visits your blog, or where you want to put all your posts in reverse order.

This article is about options for giving your Blogger blog a "home page". 


It lists three options, and gives advantages/disadvantages of each approach, and links to articles with details about implementing each case. If you can think of any more approaches, please leave a comment below.


Summary:

Options for giving your blog a home page include:
  • Static page combined with a custom re-direct - as discovered by Mian Shahzeb.
    June 2012 update:  this is now my recommended method of home-page implementation, and I am progressively applying it to those blogs that need a "home page".
  • Displaying all the posts in reverse order
  • Choosing one post to be a welcome message, and always giving it the latest post-date
  • Displaying a gadget at the top of your posts area, and only showing it on the home page.

Advantages and Disadvantages of each option:

OptionAdvantagesDisadvantages
Static page and custom re-directNo template editing is needed

Easy page editing - no messing around putting content into a gadget

No gaps on other pages due to the gadget being "missing"

Simple, elegant, and fully functional.
Google probably didn't intend to give us this option when they set up custom re-directs, so it's possible that they might remove it again.   (It's such a nice solution, though, that I think it's worth the risk for now)
Show all posts in reverse orderGreat for new readers - they can "follow the story".Return visitors have to navigate down to where they were up to last time:  the blog has no way of helping them to remember where that was.

You can't use most of Blogger's date features:  newer and older posts links will take the reader in the "wrong" direction.  And you have to manually enter any dates that would be relevant.

Your posts will get "older" as you write more:  this may confuse search-engines, and there's a risk that google might to things to "very old" posts in the future.
Make one post always show up firstYou can still use all of Google's date features.

Readers will know when you actually posted to your blog.

Great for returning readers:  they can see your (current) welcome comments, and then go straight to the latest post after that.
You have to remember to edit the "chosen" post every single time that you make a new post - one day, you might forget.

This approach probably won't work on multi-author blogs:  there's a very high chance that someone would forget to edit the chosen post and change its date.
Show a "welcome gadget" on the home page onlyDoesn't need any changes to Post date-time settings.

Your blog still functions like a blog (older/newer post links , archive gadget etc).

An HTML/Javascript gadget can be very flexible, and you can get Blogger to write all the HTML for you - seeMaking a Gadget Like a Post.

You can use things other than text, eg a picture or even a poll.

It includes an extreme option:  you could show no posts on the "home" page, and just show the gadget.
You need to edit your HTML template to make this work.

You need to re-do the template customisation every time that you change templates.

The welcome gadget isn't one of your posts: it's not included in exports of your blog contents (It is in an export of your template - but I don't think that the words inside it are included).

A gadget cannot show quite as many things as a post.  


Can you think of other ways?   Please leave a comment below.


A non-option:  Setting the homepage's post date into the future

Some people suggest that you can set the post-date of your main page in the future - and at some times in Blogger's past this has worked.

But now that scheduled posting is working the way most people expect it to (ie if you write a post today, and publish it with tomorrow's date, then it is shown to your readers from tomorrow onwards), this will not work - because your "home page" won't show until that future date is reached.

There may be some ways you can fudge it in to working (eg post the page with a date in the past, and then post it again with a future date).   But I VERY STRONGLY don't recommend this:  even if they work today, they may stop working at some time in the future when Google make a change to how future-dated posts are handled. 

Adding a new CSS (formatting) rule to your blog's template


This article is about how to add a new Cascading Style Sheet (CSS) rule to your blog's template.

(It assumes that you know the CSS command for the rule you want to add:  check a CSS reference guide if you need help to write the command - I've found Sitepoint's HTML Utopia: Designing Without Tables Using CSS very useful.) 


What are CSS rules


CSS rules are a way to apply standard formatting to HTML:  you say what formatting rules are in the rule definition, and then just use the rule nameeverywhere else in the blog that you want to apply that particular format.

It's useful because it lets you change the formatting throughout your blog bymaking a change in only one place (the rule).

If your blog has a Designer or Dynamic template, then adding a CSS rule is very easy.

If you're using a Layout or Custom template it's a little more complicated - and you should make sure you're aware of the disadvantages of changing your blog's template.


Adding a CSS rule to a Designer or Dynamic template


1  Log in to Blogger, and go to the Dashboard.

2  For the blog that you want to add the rule to:
In pre-Sept-2011 Blogger (ie the old interface) choose Design > Template Designer > Advanced.
In pre-Sept-2011 Blogger (ie the old interface) choose Design > Customize > Advanced

3  Scroll to the bottom of the list of options, where there is an item for Add CSS.  Clicking this opens a panel on the right hand side of the screen.

4  Enter the new rule underneath any other rules that are already listed in the panel.   (Unless, of course, you want to change one of the rules that was entered before.

5  Click Apply to Blog (top right corner of the screen), 


NB  The Add CSS window now shows you any rules that have been added to the template via the window previously.


Adding a CSS rule to a Layout template


1  Log in to Blogger, and go to the Dashboard.

2  Edit your template in the usual way.

3  Insert the new rule immediately before this text:
]]></b:skin>
  </head>

Note:  it's likely that there will be other rules already before the quoted text.  Make sure that you don't interrupt them, ie that your new rule is placed after the close-bracket } for the rule that's there already, and before the first ]


Adding a CSS rule to a Classic template


1  Log in to Blogger, and go to the Dashboard.

2  Edit your template in the usual way.

3  Insert the new rule immediately before this text:
  </head>

Note:  it's likely that there will be other rules already before the quoted text.  Make sure that you don't interrupt them, ie that your new rule is placed after the close-bracket } for the rule that's there already, and before the </head> statement.

How to edit your Blogger template


This article is about how to edit Blogger templates, using either the old or new interfaces.

It supports many other articles on this site, which suggest specific template changes to solve particular problems.


Previously, I've looked at whether it's a good idea to edit your Blogger template or not.

For many people, editing the template is acceptable, because it is the only way to do what they want (remove the attributionshow a gadget on the homeppage onlyadd a Facebook like button to posts, etc).


In general, the process to follow is:
  • Open the template-editor
  • Make a back-up copy of the template, as it is now
  • Make the change
  • Check that it works, and if not, go back to the previous template.

The new Blogger interface has added a couple of extra "twitches" to these steps, though.   Read on to learn more:


How to open Blogger's template editor, for dynamic template blogs:


If your blog has a dynamic template, then use the see-all-posts icon for the blog to get into it the blog-options screen for the blog that you want to edit.

When you are in the see-all-posts mode, the the address bar in your browser is like this:
http://www.blogger.com/blogger.g?blogID=5381944372768369653#allposts/postNum=0

Copy your blogID number - that is, the digits between blogID= and #allposts (it's bold in the example above)

Go go
http://www.blogger.com/html?blogID=NNNNNNNNNNNNNNNNNNN
where you have replaced NNN... with your blog-ID


Note:  the last time I tried this, it automatically opened in the old interface's template editor.   As always, make sure you take a backup copy of the template - see instructions below before changing this.


How to open Blogger's template editor, for non-dynamic templates:


Using pre-Sept-2011 Blogger, AKA the old  UI / version of Blogger :
  • Go to the Design > Edit HTML tab

Using post-Sept-2011 Blogger, AKA the new  UI / version of Blogger :
  • Go to the Design tab
  • Click Edit HTML
  • Click Proceed
  • Check that you can see the Save template button at the very bottom of the editing window.
    If you are using a very small screen, you may need to make he font smaller (ctrl/- in many browsers)..    


First, make a backup copy of your current template:


It's tempting to skip this if you're only making a small change. I even skip it myself sometimes. And it's not needed if this is the first time you've ever customised your template - because you can recover from problems by just reinstalling the standard template.

But if you would be upset to lose any template changes you made earlier, or if the change you are making now is not minor, then I strongly recommend making a copy before you start, just in case.  To do this

  • Click the Backup / Restore button near the top right of the dashboard (as shown below)
  • Click the Download Full Template button, and then wait while the file downloads.
  • After the download has finished, find the place where your computer puts downloaded files.
  • Find the file that was just created,
  • Rename it to something sensible
     (eg MyBlog template backup before change 31 Jan 2012.xml)
  • Move the file to somewhere safe: usually somewhere on your computer is fine - or you make like to upload it to somewhere like Google Docs, to be absolutely certain that it won't get lost.


Then make the change to your template:

  • Check whether the change you are making needs the Expand Widgets checkbox off or on, and put it to the right state.
    (If the article telling you want to change doesn't mention it, then assume it should be off.)
  • Find the code you need to change:
    (hint: use your browser's find-function, eg Ctrl/f in Chrome and Firefox, to locate the code you're looking for - it's faster and more accurate than scanning manually)
  • Make the change (this article doesn't go into the principles of template design, there are plenty of other articles and websites about that: I'm assuming that you know what you need to do).
  • Click the Preview button:

If Blogger can make sense of the change you made, then a new window or tab opens, showing a view that looks like your blog's homepage. It's not a real copy of your blog (the links won't work, the spacing might not be quite the same, and it will have the word "Preview" diagonally in the top left corner).


Do a quick check that the screen looks right - for some changes you even be able to tell if the change has been successful just from this preview screen.

However:  If the new window/tab shows an error message like
Your template could not be parsed as it is not well-formed. Please make sure that all XML elements are closed properly. <br/> XML error message: The element type "div" must be terminated by the matching end-tag "</div>".Error 500
or
Your template could not be parsed as it is not well-formed. Please make sure that all XML elements are closed properly. <br/> XML error message: Element type "b:widget" must be followed by either attribute specifications, ">" or "/>".
then Blogger has not been able to understand the change you made. Sometimes the error message gives a clue about what's wrong, although it can be misleading.   Check that you made the change correctly - fix any errors and click Preview again.  If it still doesn't work, ask for help from the place that suggested the change you are making.

Once you are happy that the preview screen looks OK, click the Save or Save templatebutton.


How to test your template change:


Some template changes can be checked very easily, sometimes from the preview screen.

But if your change isn't visible on the front screen, you must check it after you have applied it. What to verify depends on your template type, what the change was, and what other features (eg the page-gadget as a menu, the archive widget, ) your blog uses. You need to decide what to test, based on all of these.

At least, I alwways click on and check on these things when I've made a major template change:
  1. the home page
  2. the items in the menu bar
  3. a label value
  4. an archive widget entry
  5. custom-search-engine results
  6. comments

And if I'm being particularly reader-focussed, I'll also check these things in more than one browser:   usually in the current version of Internet Explorer, Firefox and Chrome.


Fixing Problems:


If you find that the template change has caused problems, then ou have have a choice to make:
Can you and your readers live with the problems on your blog for "a while", while you look for other solutions? 
Or 
Do you need to remove the change right now, so visitors can use your blog as it was while you solve the issues.

There is no right answer to this question:   It's a personal decision, based on the blog, and your readers. 

But if you do need to remove the template change, here's how to do it:

  • Click the Backup / Restore button near the top right of the dashboard
  • Click Choose File and find the file that you downloaded earlier
  • Click Upload.


It is best to restore your template before you have changed any gadgets.  If you get a message about widgets being missing, then it means that the gadgets associated with your blog are not the ones referred to in the template.   If this happens, you need to decide whether to deep or delete any "orphaned" ones, and may need to check their settings again.


Making complicated changes:


If you your template may need a lot of "surgery" while you figure out how to make a change, then it may be a good idea to build a private test-blog to do the work in, and only copy the contents into your "real" blog template when you are certain that you've got it correct (or correct-enough).
Related Posts Plugin for WordPress, Blogger...